Dev Environments
Harness multi-stage builds to create optimal images

Create maintainable, minimal containers with multi-stage Dockerfiles for all application needs.
We’ll define an optimal image as one that is as small as possible with the least amount of dependencies for its given purpose. Small containers are desirable since they increase security by limiting potential attack vectors and improve performance by allowing container runtimes to build and pull images faster. An optimal container leverages caching principles and will enable us to rebuild and develop our containers quickly.
Maintainability is the art of limiting complexity while increasing features. In this case, we are looking to support many purpose-specific containers for our application’s lifecycle. Let’s take a closer look at the application lifecycle.
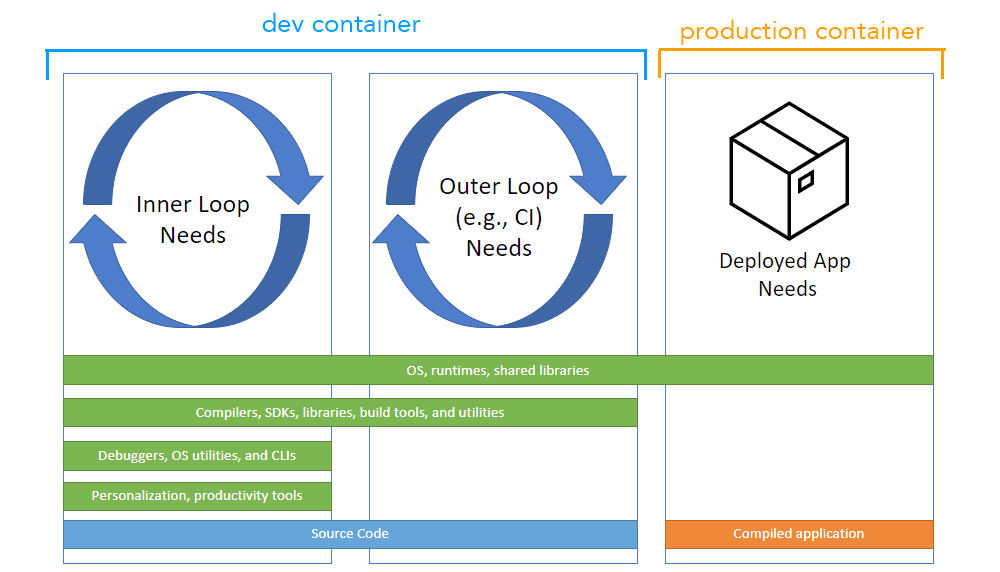
In general, as we look at the figure from left to right:
- more dependencies → fewer dependencies
- bigger container → smaller container
- more frequent changes → less frequent changes
- Dependencies found in prod will most likely be required in CI, and CI dependencies will most likely be needed in dev.
Let’s create a strategy that attempts to address these constraints. Let's start with a standard Golang Dockerfile. It has two stages: the “builder” and the “release.” The “builder” includes the code and tools required to build the binary. The release only has what the release artifact needs and nothing more.
A link to the repo
Here's the repo. A python example 🐍 is also provided to demonstrate an interpreted language.
# Dockerfile
FROM golang:1.18 AS builder
# only copy what we need (source files) to improve caching
COPY main.go go.mod ./
RUN go build -o /app

FROM scratch AS release
# install things we need for release (most minimal)
COPY --from=builder /app ./
CMD ["./app"]
$ docker build --tag release --target release . # build release
Multi-stage Dockerfiles allow us to create multiple images out of a single file. We compose a new “release” image out of the “builder” using the COPY --from command, then create each image with the --target flag. We can also extend an image as well without having to resort to using a container registry.
# Dockerfile
# ... continued from above
FROM builder as ci
# install things we need for CI: linting etc
# only copy what we need to improve caching
COPY .golangci.yml ./
COPY tools ./tools
RUN cd tools && make install

FROM ci as dev
# install things we need for dev: utilities, helpers, etc
RUN apt-get update && apt-get install -y
   vim \
   default-mysql-client
$ docker build --tag ci --target ci . # build ci
$ docker build --tag dev --target dev . # build dev
Here we create another two images built on the previous. The “ci” image is extended from the “builder” image, and the “dev” image is extended from the “ci” image.
Each image achieves its goal with minimal dependencies, and the strategy colocates the logic allowing us to re-use dependencies in downstream environments. It also makes adding more app stages super simple if we want to provide higher granularity.
We also make good use of cache principles. Things that change less often, such as Golang 1.18, are placed at the root of the file, while dependencies that change more frequently, such as dev tools, are defined later.
Dev, CI, and prod differences become very explicit when using this strategy, improving debug-ability. Additionally, it creates pressure to minimize the differences between prod and development, resulting in reduced bugs.
Using Dockerfiles with multiple stages provides an easy and maintainable way to create optimal containers for all stages of your application lifecycle.
Next Steps
If this interests you, you may want to checkout some adjacent tooling.
- slim.ai - helps optimize containers
- earthly.dev - simplifies container build and CI processes
- Additionally, learn more about multi-stage builds.